One of the most common problems all board gamers have is how to pack up their game and store its components in the game box. What's the best way to keep all the bits organized and prevent them from getting lost? This becomes especially true when expansions are released, which often come in their own boxes. Do the expansion components fit in the original box? Do you keep the expansion box and its components separate? These are all questions we've asked ourselves.
There are several things to consider when choosing a method of organization and storage:
- Time - How much time do you have to commit to your storage solution? Consider both the time needed for setting up the original storage system as well as the time needed to sort and organize the components every time you play the game.
- Cost - How much are you willing to spend? If you have a lot of games, then it can become quite costly to buy specialized storage solutions.
- Space - How much space do you have to store your games? Are you willing to keep all expansion boxes on your shelves alongside the base games' boxes? The more bulky the storage solution, the more space on your shelves it will take up.
- Travel - Do you travel with your games to meet-ups or cons? How you store things is important when you're transporting your boxes.
- Coolness - How important is the admiration of your fellow gamers? Because some methods simply look cooler while others will function better.
I've been gaming a long time and own a couple of hundred games and expansions. I have tried every one of the organization and storage methods discussed below and have a lot of experience with each. I'm going to discuss each method, give the pros and cons of each, and hopefully help you decide how best to store your games' bits.
In the old days, when board games only had a few components and long, skinny boxes, we just threw everything in the box and slapped on the lid (which usually had one corner split and flapping). The box was then put in a haphazard pile of similar boxes on the floor of a closet or somewhere in the basement. This is how I stored my game of Monopoly, and thus, I must include it as a legitimate method of storing your games.
How to Do It
- Fold your game board in half like a taco, slide all the stuff to the middle, then dump all of it into the bottom of the box. Scoop up the rest up with your hands and toss them in, too.
- Then throw the board on top of it all and slap the lid down. Easy peasy.
Pros
- Very fast clean up! Just tell people to throw everything in the box as fast as they can!
- There is zero cost involved. That is, if you don't count the cost of replacing lost pieces.
- Supports your "I don't care about anything" persona.
Cons
- Increased likelihood of lost components, especially if you store your games on their sides (book-style). They will fall out of the box if the lid isn't on tight.
 Setting up the game next time will take longer because you will have to sort the components that are piled in the corner of the box.
This method is truly for the "I don't give a shit" / Marlon-Brando-in-A-Streetcar-Named-Desire type gamers who simply don't care about their games. I strongly recommend against using this method if you are over the age of 11; you will loose pieces and be frustrated at sorting everything the next time you play. I mean, does anyone really do this anymore?!? The horror!
Once I started buying games in earnest, my (not-yet) wife and I wanted to organize the interiors our game boxes. Inserts weren't really a thing yet, so we would spent long hours in the Container Store buying cool little boxes and containers to store all of our game parts in! We even brought components with us to the store so we could see which fit best. A bit anal-retentive, I admit, but oh-so-much fun for the organizers in us.
How to Do It
- Catalog the components and have an idea of how you want to organize them before going to the store.
- Know the box's inside dimensions, too. This includes the depth you have to work with after all of the boards and rule books are placed in the bottom of the box because you'll want the containers to fit below the lip.
- Go to the store and shop around. In the Container Store, check out all sections of the store because they will each have unique container options: kitchen, office, craft, and general storage. You can go with multiple individual containers or one craft-style container with many compartments. Remember, you'll probably whatever you choose to fit inside the box.
- Pay up, take your containers home and fill them up with bits.
- Label them to be extra fancy.
Pros
- You get nifty containers for all of the components. You will get compliments from your gaming mates.
- You can color coordinate your containers with the player pieces. This will get you even more compliments.
- Not matter how you store or carry your game boxes, everything stays sorted!
- Setup goes faster because everything is already organized.
- They don't take up much space themselves, meaning you can pack a lot of stuff in the same box (including expansion components).
 Cons
Cons
- It takes a long time to find the perfect container(s). If you have kids tagging along with you to the store, this is not a viable method!
- This approach costs a fair amount of money. The containers range between $1 and $10 each and you will probably need multiple per game. Further, if the game later comes out with an expansion, you might need a new container to fit those components, too.
- Clean up will take a bit longer as pieces will need to be put in their proper containers, especially if being done by others who don't know which bits go in which compartments. Labeling them will help, though.
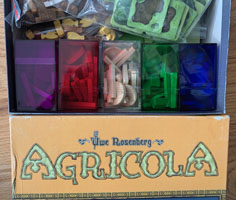
Even before we had kids and had time for long, relaxing trips the store, we had moved away from this method. It took a long time shopping around to find the exact-right containers and the cost per game was adding up. While we still enjoy the fun containers when we play those games, such as the color-coded Agricola player part containers, we have moved on. This method is great if you have the time, inclination, anal-retentiveness, and money to do it right, but there are better options nowadays.
In the age of KickStarter where fancy minis and superfluous stretch goals are important, games are increasingly coming with their own vacuum-molded inserts. Both Lisboa and Vinhos Deluxe came with very nice ones, including lids. Game publishers spend the time figuring out how to best store the bits so you don't have to. However, they often don't explain how to best utilize it; they leave that mystery to you. People either love them or hate them.
How to Do It
- Like the prize at the bottom of the cereal box, you get the insert by default.
- Usually, a new game doesn't have everything organized. After punching the cardboard, you'll need to figure that out yourself.
- A bit of searching online will often reveal how others have used the insert. BoardGameGeek is a good place to start.
Pros
- While they don't look amazing, they look nice enough.
- All of the bits fit nicely into them (assuming they were well designed).
- Setup goes faster because everything is already sorted.
Cons
- You have to always carry and store the game box horrizontally. If you store or carry your games on their sides (book-style), then the bits will fall out of their cells into other cells. This defeats the purpose of sorting them when cleaning up!
- There is a lot of wasted space under the insert.
- Often expansion components don't fit, meaning you have to keep/carry the expansion box, too.
- Clean up will take a bit longer as pieces will need to be put in their proper compartment. Labeling each compartment will help, though.
I tried to like these, I really did. They cost nothing and are fairly well designed. I used the Vinhos and Lisboa ones for a while but had limited success with them. Even with the lids, both suffered from bits falling all over the place when stored or carried upright, especially the heavy metal coins. This meant I had to reorganize the box every time I opened it which got real old, real quick. Nowadays, I simply throw custom inserts right into the trash without a second thought and use another method. Included inserts are for those who want a organization and storage solution beyond dumping everything in the box, but still at a little-to-no cost or effort.
In 2015, the aftermarket purchasing options were limited to upgraded meeples and the such and existed only for the popular games. Since then, the aftermarket industry has exploded. The exponential increase in interest in board games, access to inexpensive and easy-to-use manufacturing tools (ex. 3D printers), and Etsy have spawned endless purchasing opportunities.
This market now produces custom inserts for all sorts of game. Like publisher produced inserts, they are designed to fit in the box and easily store all of a game's components in categorized slots. They are well thought-out and often take into account the game's expansion components, too. Some are so well designed they have trays that can be removed and used during play so the bits aren't spread all over the table.
Most of them are made from CNC laser cut birch plywood pieces, which have to be assembled by you. 3D printed inserts are made of a nylon-like plastic. Some are even made out of glued foamcore, but these are much less durable.
How to Do It
- There are a number of marketplaces to buy from: Etsy and Meeple Source are some of the major ones. Shop around because there are many more sites, but under no circumstances should you buy from a company that treats their employees like this.
- Consider these questions when looking at options: Does it fit in the box? Does it look easy to use? Will it protect the components? Does it support existing expansions? Unforeseen expansions?
- Read the reviews! What do people say about the design? Are there quality/durability issues?
- When you receive yours, you'll probably need to assemble it. Laser cut wooden organizers usually need to be secured with glue which can take a while to do.
- Lastly, fill it up and enjoy the admiration of your peers.
Pros
- They look fancy and other gamers will think you're rich.
- As these are often well-designed, all of the bits fit nicely into them (even expansion bits).
- Setup goes faster because everything is already sorted.
- These are great for keeping cards safe.
Cons
- Very expensive! When I wrote this article there was a Gloomhaven organizer that costs nearly $90!
- They add a lot of weight to the box, especially the wooden ones.
- The insert itself takes up a lot of volume in a box.
- Some assembly required (including glue).
- Clean up will take a bit longer as pieces will need to be put in their proper compartment. Nicer organizers will have pre-printed labels which help.
- Did I mention how expensive they are!?! I mean, you can buy Gloomhaven for only $101 right now.
In the end, custom inserts succumb to the same problems that publisher inserts have: parts falling all over the place when on their sides. While I respect the ambition of people with laser cutters and 3D-printers to make a buck, this industry is over-the-top. Some of the inserts are over-designed, thus making them very expensive. If the game is one of your top-3 games, I can see splurging on a fancy upgrade for its storage, but personally, I would rather spend the money for upgraded bits, meeples, or other play-related components.
A caveat to all of this are the specialized boxes to hold card-based games such as Dominion, Munchkin, and CCG/LCG games such as Magic: The Gathering. Games like these, where the only components are hundreds (or thousands) of cards, really benefit from an all-in-one storage box and there are many, great aftermarket options from which to choose.
I'm the crafty type (in more ways than one... BING!). I love to create things which is why I am a founding member of the Maker Space Arch Reactor in St. Louis. Thus, I have built one or three custom inserts for a few of my games over the years. Pictured is the custom insert I made for Food Chain Magnate out of foamcore board and glue. As satisfying as creation is, this method is not for everyone.
How to Do It
- This is hard to answer because there are so many ways to go about it: foamcore/glue, laser cutting birch plywood, 3D printing, concrete blocks... you name it. Each approach has its own process so I'm going to stick to generalities.
- First, do your research and see if there are any free designs out there for your medium. It will save you a lot of time if you can just download the CNC file and hit print.
- Otherwise, you'll have to design it yourself. Not only do you need a solid understanding of what needs to be stored and how it should be organized, you need to know the sizes of everything. You'll need to create storage cells for cards, wooden bits (possibly removable for added functionality), player parts, coins, dice, etc...
- You can either make cells for every different bit or you can do a hybrid, like in my FCM insert, where you have storage for some things, but others go into bags.
- Checking out the commercial organizers will give you some design ideas, too.
- When you start to build, take your time. Remember: measure twice, cut once.
Pros
- Setup goes faster because everything is already sorted.
- You can organize your games exactly how you want them!
- Get your creativity on and you will be the envy of your gaming group! Other Makers will give you high marks for your Maker skills.
- Building your own insert is far cheaper than buying a custom one (not including the cost of any special tools you may need to purchase).
Cons
- The design and construction of custom inserts takes a lot of time.
- Unless you design yours with the expansions in hand, it will be hard to allow for them in your design (if you even want to). Especially when you don't know what future expansions may come.
- Requires skills and tools you may not have.
- f you want to go the 3D-printed or laser cut route, these are expensive tools that require a lot of skills to get working correctly. Then finding or creating the files to feed into the printers is work as well.
As much fun as I had building my own custom inserts, they took a lot of work and time and often had design issues that presented themselves after the fact. This resulted in my inserts being less-than-ideal in the long run. Plus, all inserts succumb to the same flaw: parts falling all over the placed when on their sides. This can be solved by putting lids on everything, but they will just take up more volume in the box. In the end, I stopped making them.
You don't have to be a drug dealer to want to put all of your stuff in little baggies. Using this method, you simply put all of your components in separate bags and put them in the box. This keeps your components safe from loss and organized separately. You can leave your bags unlabeled so you can use any bag for any component when cleaning up or, as I prefer, label each bag with what goes in it. This solves two problems: it makes clean-up go faster because I can just give bags to people and they know exactly what to put in them and it avoids situations were small things go in big bags first, then the big things are stuck in the leftover small bags.
How to Do It
- If bags aren't included with the game, you can buy them in bulk online. You can use Ziplocs if you so choose, but I'd recommend gaming-specific bags of various sizes.
- Simply sort your components and put them into individual bags. You don't have to use the same sized bags for everything: 2 dice don't need to be in the same sized bag as 50 coins. Using different sized bags will help save space.
- I usually put all of the bits a player uses into individual bags, too. This way I can just hand them a bag containing everything they need. Sometimes, I even include in these player bags the starting resources (ex. starting money) to help speed up setup the next time.
- Label each bag with its contents. I use an inexpensive label maker which makes easy-to-read sticker labels. You can also use a Sharpie, but it won't stay readable very long on plastic bags.
Pros
- Bags are very inexpensive (if they aren't already included) and very easy to buy. You can even use Ziplocs if you want, but I prefer using game-specific bags.
- Setup goes faster because everything is already sorted.
- Clean-up goes faster because you can just give people labeled bags and they know what to put in them.
Cons
- A pile of bags doesn't look that impressive when you slide off the box top.
- Bags will keep decks of 30-50 cards relatively safe, but aren't ideal for only a couple of cards. More on this below.
- Labeling the bags when you first organize your game's components takes a bit of time (I actually enjoy this process). Plus you have to own a label maker, but they aren't expensive.
- The bags eventually will need to be replaced, but they're cheap and easy to come by.
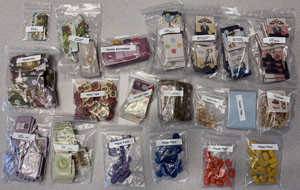
In terms of ease and cost, bagging everything is right up there with using an insert included by the publisher. So which is better? Like I said above, Vinhos Deluxe came with a very nice insert including a lid. I used it for a while because the contents of one cell didn't spill over into another much, which is my major complaint of them. However, it took a long time to put the game away. Everything had to go in its dedicated cell in a specific way so they all fit. So, I timed it and it took about 13 minutes for 3 of us to put the game away properly into its insert. Once I had converted it to bags (as pictured), it took me 5 minutes by myself to get the game back in its box. When I have people waiting for me to start the next game, the time savings was the deciding factor.
After a decade of gaming, mainly at meetups where I traveled with my games, I have come to realize this method is the best way to organize and store your game components. Anyone new to organizing their games should start with this method. Not only is it low cost, low weight and low volume, it is easy to implement. It also makes clean-up go much more smoothly and keeps everything separated regardless of how the box is stored or carried (I store my boxes upright/book-style).
The only caveat I have is for cards. Bags aren't ideal for cards; 1 to 10 cards in a bag risk being bent and 50+ cards usually won't fit. So what do you do with big sets of cards? Card boxes, of course. There are many different sizes and types of boxes: plastic ones for small amounts of cards and large, cardboard ones for large numbers of cards (think of the old baseball card boxes).
Games such as Agricola and Food Chain Magnate that have a plethora of cards in addition to a lot of wooden/plastic bits suffer from the problem of what to do with the cards, especially when expansions add more cards to the decks. There are just too many cards to fit in the box, especially when sleeved. For these games, I store the bits and boards in the original box and store their cards (sleeved or unsleeved) in appropriately sized card boxes.
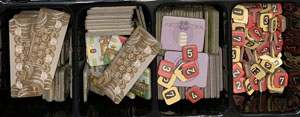
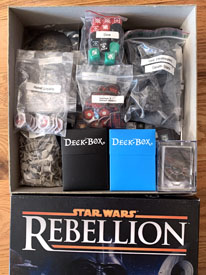
If the box (or boxes) of cards fit in the game box along with the bagged components, like in my Star Wars: Rebellion box, great! If not, such as my 12" long card box containing 1,000 sleeved Agricola cards, I store them separately from the game box. With a label, they are easy to grab along with the game box when I am playing that particular game. I even use index-card dividers to organize the cards within larger deck boxes.
Games like Dominion, Munchkin and Magic: The Gathering, that are ostensibly cards-only and have tons of expansions, I store solely in card boxes. I like how little space they take up on the shelf and how inexpensive they are. As horrifying as it may sound, I actually throw the original boxes away!
There are many aftermarket storage solutions for card-only games and if you are a big fan of the game, then they are probably worth the money. But if you are only so-so on the game, then the value of an expensive, game-branded box might not be there. In that case, inexpensive card boxes will serve you well.
I've tried a wide variety of game component storage over the years; our collection includes 200+ games/expansions and their organization and storage methods vary widely. I have come to realize that it makes the most sense to store game components in labeled bags in the box. I store larger decks of cards in card boxes, sometimes separately, sometimes in the game box. This two-pronged method is inexpensive, simple, space-saving, low maintenance, and easy to use (especially during clean up). Thus, I use this method 100% of the time.
Do you agree? What methods have you had success with? Leave a comment and let me know.
Comments
Login to leave your own comments!
Note: all comments are reviewed by me before they are posted publicly